
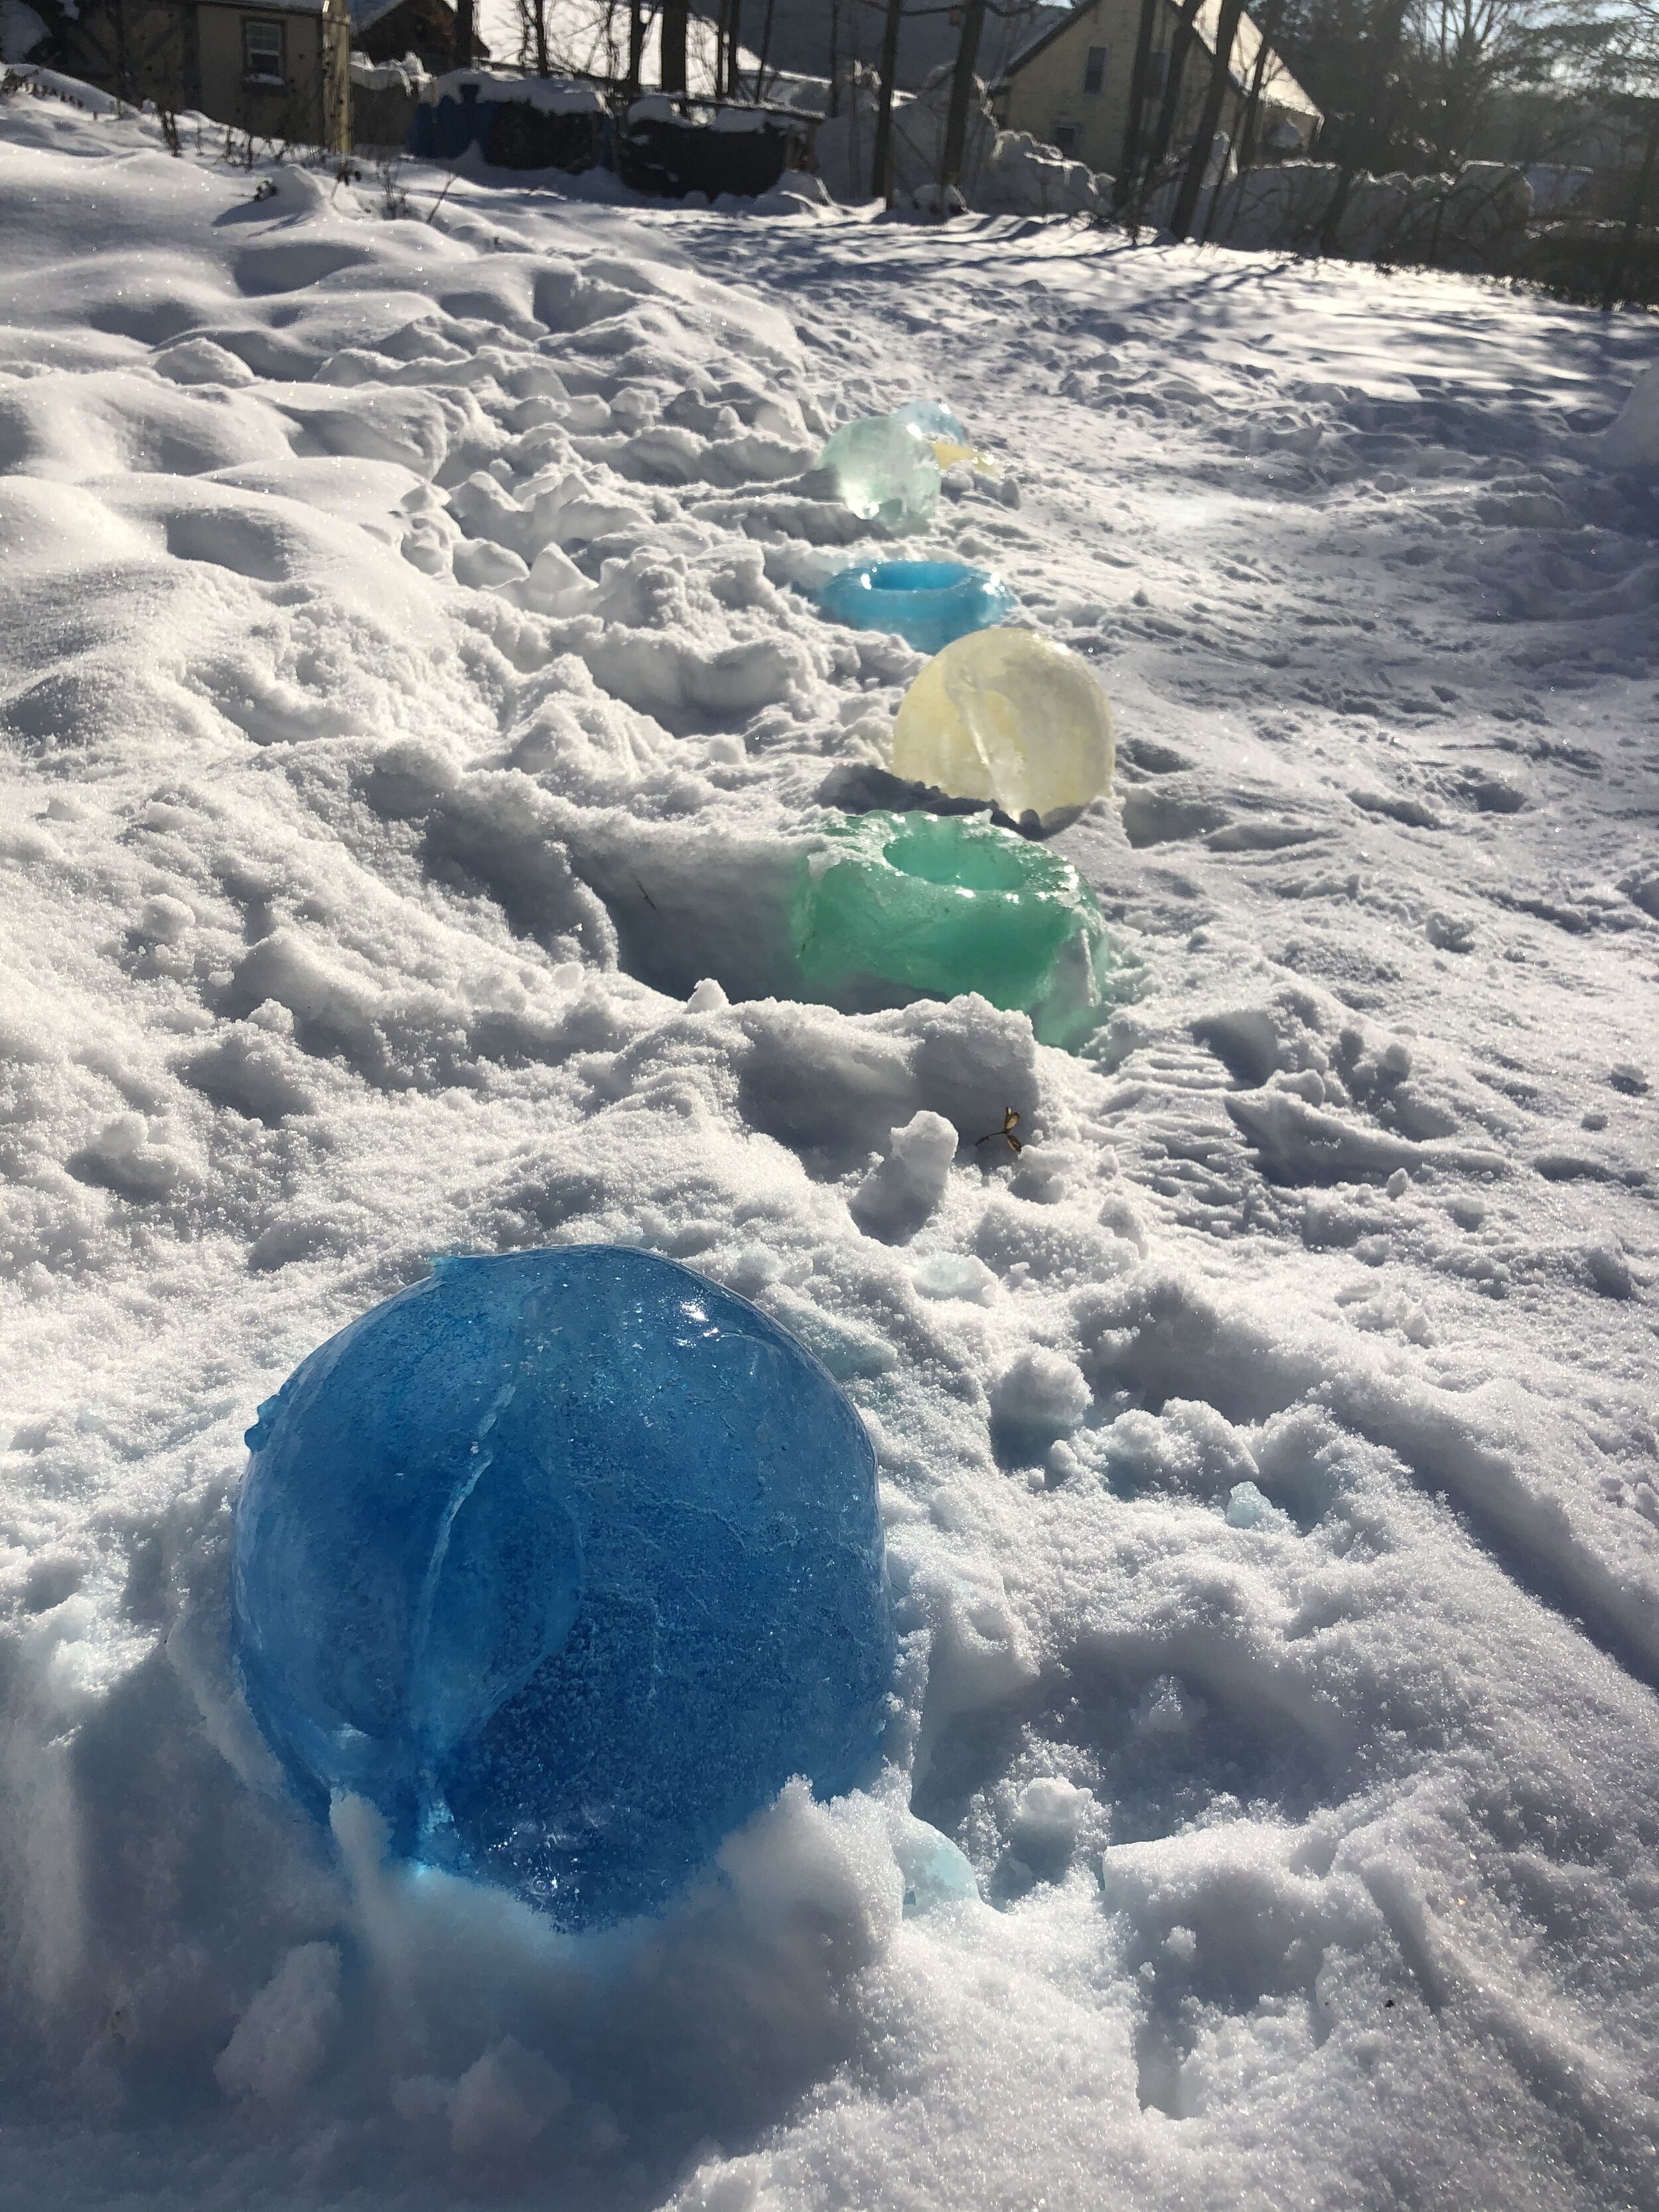
How-To: Make Your Own Ice Luminaries
/
ICE LUMINARIES
Light up your town or neighborhood with simple, cheap, beautiful little lanterns made of ice.
What’s an ice luminary?
Luminaries (a.k.a. luminarias, or farolillos) are “little lanterns.” You’ve probably seen the traditional kind — candles in little paper bags, spread out along a street or park. Ice luminaries are a simple, winter-friendly twist on this popular idea. And best of all, they’re (nearly) free to make and share. Freeze a bunch to make a night-time event extra special or create beautiful decorations for your town or neighborhood. Experiment and have fun!
Materials
It doesn’t take much to make a simple ice luminary. Once you learn the basics, you can get creative with more artistic elements and shapes.

Water
Water-tight molds (balloons, bundt pans or food molds, buckets, or recycled food containers)
Candles (tea lights, small pillar candles, flameless LED candles, or string lights)
Optional additions (food coloring or dye, natural materials)
Really cold weather or a really big freezer
Steps
1. PLAN YOUR PROJECT. Before you get started, make a few key decisions. How many luminaries do you need to make? What kind of candles will you use? When do you need them? Do you need permission for your location?
The colder the weather, the faster they’ll freeze and the longer they’ll last. Start far enough ahead that they have time to freeze, and be sure they’ll stay frozen until you need them. Balloons or small molds might freeze overnight on a cold night. Large buckets or pots might take a few days.
Pro tip: If you need to make luminaries ahead of time, bury them in snow or a shady area to keep them from melting. Pour water on top to remove snow and clean up the surface before lighting.
2. CHOOSE A TYPE OF LIGHT. There are several major options, each with some benefits and drawbacks.
Traditional candles are cheap, easy, and you can find them everywhere, but they take a little extra work. You’ll need a fire-safe location and a night without too much wind (or well-designed luminaries). You’ll need to light and extinguish each one. and wind can be a problem. You’ll need a hollow luminary that’s open to the top or side, with a flat spot to set the candle. For most small luminaries, look for tea lights or votives.
Flameless/LED candles look like the real thing, but operate on small button batteries. Most last for up to 100 hours and produce no heat, so no fire risk. You can set them directly underneath a solid luminary. You can even find some with timers, which will turn on and off each day. Plan ahead — flameless candles cost a little more and you may need to order online.
Waterproof string lights make it easy to set up and light a longer trail or path. Lay out a string of lights in a line or shape, place a small ice lantern placed on top of each bulb, and plug in the whole string at once. Look for larger LED bulbs spaced further apart, or use smaller fairy lights and bunch up a cluster inside a luminary.
3. GATHER YOUR MOLDS. Gather molds based on the size, shape and type of luminary you want to make. Here are a few common styles. Don’t be a afraid to mix and match shapes and styles.
Balloons make beautiful, round globes. Choose a larger, sturdy balloon to be sure it holds.
Bundt pans or food molds are an easy way to create decorative shapes with an open center — perfect for traditional candles.
Buckets, flower pots or recycled containers all work fine, whatever the size or shape.

4. FILL YOUR MOLDS. When the temperature drops (or you clear out your freezer), get ready to freeze your luminaries. Fill your molds with water to the depth you want. Remember that water expands as it freezes, so leave a little extra space. If you’re filling balloons, stretch the opening over your faucet and support them in your hand as they fill.
Pro tip: if you’re using flameless candles with balloon molds, set the balloon over the candle to freeze. The water will freeze around the candle, creating a perfect form to hold it.
5. ADD DECORATIONS. If you want to add any decorative touches, now is the time. Drop in a few drops of food coloring or dye, sprinkle in some pine needles or berries, or artfully arrange sticks or twigs. Avoid glitter, plastic or non-natural materials to make cleanup easier after they melt.
6. FREEZE YOUR LUMINARIES. Set your luminaries outside (or in your freezer) to freeze solid. If you’re setting them outside, avoid burying them in the snow — they’ll freeze faster if exposed to cold air. Remember that ice freezes from the outside in.
If you’re making solid forms, you can leave them until they are completely frozen. If you’re making hollow/open luminaries for a traditional candle, check them often. You’ll want to stop when there is a solid outside layer, but the center is still unfrozen.
7. REMOVE THE MOLDS. When your luminaries are frozen, it’s time to pull off the molds (easier said than done). If it’s a sunny or warm day, flip them over and let the sun loosen the mold. You’ll be able to lift it right off in no time. If you’re making hollow or open luminaries, drain out the extra water inside and smooth or widen the opening if needed.
Pro Tip: In colder weather, you may need to bring the mold inside or pour some hot water over the outside to loosen it up.


8. ARRANGE YOUR LUMINARIES. Set up your luminaries for ongoing decorations or a special event. If there’s snow on the ground, nestle them in so they sit flat. If you’re using regular candles, be sure there are no flammable materials around. Set the luminary on the ground with the hollow opening up, and place a candle inside. Try a variety of arrangements and uses:
Line a trail or path with luminaries to create a magical night walk
Spread them out through an event site or venue
Arrange luminaries of different heights to create an artistic display on a wall or steps
Spread them out through your town, or up and down your street
9. LIGHT UP THE NIGHT… AND THEN EXTINGUISH! Light your candles or turn on luminaries when dusk falls or your event starts. Small candles may burn for a couple hours, while LED candles will last for days. If you’re using an open flame, be sure to check back often and blow them out when you’re done. Turn off LED lights at the end of your event or set a timer so they’ll come on each night.
10. MAKE IT A PARTY. The more luminaries you have, the greater the visual impact. Enlist your friends or neighbors to make their own and create as many as you can. Don’t forget to take pictures!

Links & Resources
Looking for more info or inspiration? Check out these great resources.
Ice Luminary Magic book, blog and kits
Ice Lantern Festival in Vuollerim, Sweden article and video (world record holder for ice lanterns!)
Instructions for Gardenista’s Botanical Ice Lanterns, using a different method
Instructions for making traditional luminaries from the Old Farmer’s Almanac
This resource was developed for Vermont’s monthly Placemaking Meet-Up series — informal gatherings designed to connect placemakers and spread great ideas. Join AARP Vermont & Community Workshop for an upcoming meet-up or check out resources from past events.
Upcoming Events
Meet-Up Resources


It’s the season to get back outside. What better place than our streets?